 scrapy
# scrapy
https://scrapy.org/
pip install scrapy wheel shub
scrapy version

在当前目录创建first项目
scrapy startproject first .
2
3
4
5
Scrapy是用Python实现的一个为了爬取网站数据,提取结构性数据而编写的应用框架。可以应用在包括数据挖掘、信息处理或存储历史数据等一系列的程序中。 Scrapy使用Twisted基于事件的高效异步网络框架来处理网络通信,可以加快下载速度,不用自己去实现异步框架,并且包含了各种中间件接口,可以灵活的完成各种需求。

Scrapy Engine引擎
负责控制数据流在系统中所有组件中流动,并在相应动作发生时触发事件。此组件相当于爬虫的“大脑”,是整个爬虫的调度中心。 调度器(Scheduler)
调度器接收从引擎发送过来的request,并将他们入队,以便之后引警请求他们时提供给引擎。初始的爬取URL和后续在页面中获取的待爬取的URL将放入调度器中,等待爬取。同时调度器会自动去除重复的URL(如果特定的URL不需要去重也可以通过设置实现,如post请求的URL)
下载器(Downloader) 下载器负责获取页面数据并提供给引擎,而后提供给spider。
Spiders爬虫

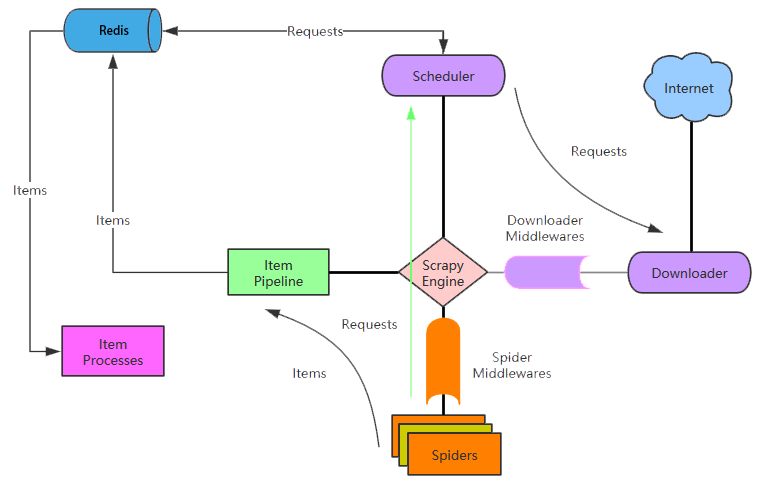
scrapy的主要组件包括Spiders、Engine、Scheduler、Downloader以及Item pipeline,其中Engine控制所有数据在各组件之间的流动,一个爬虫请求在Scrapy当中的处理过程大致如下:
- Engine从Spider接收到第一个Request
- Engine将刚刚接收到的Request转发至Scheduler队列当中,同时询问Scheduler下一个将要爬取的Request(异步执行)
- Scheduler将队列当中下一个Request发送给Engine
- Engine将Request转发至Downloader,Downloader根据Request的信息获取网站内容
- Downloader获取了完整的网站信息,生成一个Response返回给Engine
- Engine将Response转发给Spider
- Spider获得Response并对其进行处理,处理完Response之后生成Item(结构化数据),或者根据新的ulr返回Request,将其发送到Engine
- Engine将Item转发至Item Pipeline当中,Item Pipeline将会对Item做数据加工、数据转储等处理,同时Engine将接收到的Request转发至Scheduler队列当中
- 从第1步开始重复执行,直到Scheduler队列当中没有Request需要处理为止

# 组件功能介绍
- Engine: 控制数据在scrapy当中的流向,并在相应动作时触发时间。例如Engine会将Scheduler队列当中的下一个Request转发至Downloader当中,在转发Request、Response至Spider之前先调用中间件
- Spider: 用户编写的用于处理网页内容并提取Item/Request的组件,scrapy当中可以有多个Spider,每个Spider负责一种特定类型的网页或网站。在Spider当中用户需要定义网页的解析逻辑,构造Item或者是构造更深层网页的Request,同时可以在Spider当中定义针对单个Spider的配置,配置包括绑定特定的中间件、Item pipeline,以及配置并发参数等
- Scheduler: 调度器从Engine接收Request并将其加入到队列当中,调度器当中主要包含指纹过滤器以及队列功能组件,其中指纹过滤器用于过滤重复的Request请求,队列用于排队Request任务
- Downloader: 下载器的功能非常简单,根据接收到的Request请求,访问相应的地址获取网页内容,Downloader是通过将Request任务注册到Twisted的Reactor来实现并发获取网页内容的 · Item pipeline: 负责处理被Spider提取出的Item,例如针对Item做格式转换,写入文件,存入数据库

# 文档
参考源码:https://github.com/scrapy/quotesbot
爬取:https://quotes.toscrape.com/
scrapy startproject 项目名
scrapy genspider 爬虫名 域名
scrapy crawl 爬虫名

scrapy genspider toscrape-css quotes.toscrape.com
2
3
4
5
参考:Scrapy爬虫框架,入门案例 (opens new window)
# selectors
https://docs.scrapy.org/en/latest/topics/selectors.html
from scrapy.selector import Selector

response.xpath("//span/text()").get()
response.css("span::text").get()

body = "<html><body><span>good</span></body></html>"
Selector(text=body).xpath("//span/text()").get()
2
3
4
5
6
7
# pipeline
https://docs.scrapy.org/en/latest/topics/item-pipeline.html
import json
import pymongo
from itemadapter import ItemAdapter
from scrapy import Spider, Item
from scrapy.crawler import Crawler
from scrapy.exceptions import DropItem

class JsonWriterPipeline:
    def open_spider(self, spider):
        self.file = open("items.json", "w")

    def close_spider(self, spider):
        self.file.close()

    def process_item(self, item, spider):
        line = json.dumps(ItemAdapter(item).asdict()) + "\n"
        self.file.write(line)
        return item

class MongoPipeline:
    collection_name = "scrapy_items"

    def __init__(self, mongo_uri, mongo_db):
        self.mongo_uri = mongo_uri
        self.mongo_db = mongo_db

    @classmethod
    def from_crawler(cls, crawler):
        return cls(
            mongo_uri=crawler.settings.get("MONGO_URI"),
            mongo_db=crawler.settings.get("MONGO_DATABASE", "items"),
        )

    def open_spider(self, spider):
        self.client = pymongo.MongoClient(self.mongo_uri)
        self.db = self.client[self.mongo_db]

    def close_spider(self, spider):
        self.client.close()

    def process_item(self, item, spider):
        self.db[self.collection_name].insert_one(ItemAdapter(item).asdict())
        return item
2
3
4
5
6
7
8
9
10
11
12
13
14
15
16
17
18
19
20
21
22
23
24
25
26
27
28
29
30
31
32
33
34
35
36
37
38
39
40
41
42
43
# 步骤
# 1、创建项目并修改settings.py
scrapy startproject first . #在当前目录下创建一个爬虫项目first
2
修改settings.py
USER_AGENT = "Mozilla/5.0 (Windows NT 6.2; WOW64) AppleWebKit/537.36 (KHTML, like Gecko) Chrome/27.0.1453.94 Safari/537.36"

# Obey robots.txt rules
ROBOTSTXT_OBEY = False

DOWNLOAD_DELAY = 3
COOKIES_ENABLED = True

ITEM_PIPELINES = {
   "first.pipelines.FirstPipeline": 300, # 值越小,越优先
}
2
3
4
5
6
7
8
9
10
11
# 2、修改items.py
继承自scrapy.Item, 里面的字段封装成类对象
# 3、创建爬虫,并写spider/XXX.py响应业务逻辑
scrapy genspider --help

scrapy genspider -t basic book douban.com
scrapy genspider -t crawl dbbook douban.com

scrapy list
2
3
4
5
6

class BookSpider(scrapy.Spider):
    name = "book"
    allowed_domains = ["douban.com"]
    url="https://book.douban.com/tag/%E7%BC%96%E7%A8%8B?start=0&type=T"; # 编程标签
    start_urls = [url]

    def parse(self, response:HtmlResponse): # 解析html
        print(response.status)

        titles:SelectorList = response.xpath('//li[@class="subject-item"]//h2/a/text()');
        for title in titles:
            print(type(title),title.extract().strip());
2
3
4
5
6
7
8
9
10
11
12

- basic 基础
- crawl 自动爬虫,提取过滤url
- csvfeed 用来处理csv文件
- xmlfeed 用来处理xml文件
# 4、启动爬虫
scrapy crawl -h
scrapy crawl -o out.json book --nolog
2

https://docs.scrapy.org/en/latest/topics/selectors.html
# 5、编写pipeline
文档: https://docs.scrapy.org/en/latest/topics/item-pipeline.html
from itemadapter import ItemAdapter
from scrapy import Spider, Item
from scrapy.crawler import Crawler
from scrapy.exceptions import DropItem


class FirstPipeline:

    def __init__(self):
        print("init ~")

    # @classmethod
    # def from_crawler(cls, crawler:Crawler):
    #     print("from_crawler ~", type(crawler), crawler )

    def open_spider(self, spider:Spider):
        #self.client = pymongo.MongoClient(self.mongo_uri)
        #self.db = self.client[self.mongo_db]
        print(type(spider), spider.name, "~~ open_spider~~")

    def close_spider(self, spider:Spider):
        #self.client.close()
        print(type(spider), spider.name, "~~ close_spider~~")

    def process_item(self, item:Item, spider:Spider):
        print( type(spider), spider.name, "~~~~", type(item), item )
        #raise DropItem
        return item
2
3
4
5
6
7
8
9
10
11
12
13
14
15
16
17
18
19
20
21
22
23
24
25
26
27
28

# 6、反爬(代理)
思路:在发起HTTP请求之前,会经过下载中间件,自定义一个下载中间件,在其中临时获取一个代理地址,然后再发起HTTP请求
从 http://www.xicidaili.com/代理上找到免费代理,测试通过后,可以加入到代码中
IP地址测试 http://myip.ipip.net/ http://h.wandouip.com wei.xu@magedu.com/Magedu18
1、下载中间件
仿照middlewares.py中的下载中间件写,编写process_request,返回None继续执行中间件链。参考 https://scrapy-chs.readthedocs.io/zh_CN/0.24/topics/downloader-middleware.html
# scrapy-redis
文档: https://scrapy-redis.readthedocs.io/en/stable/ https://github.com/rmax/scrapy-redis
scrapy-redis使用redis list存放待爬取的request
scrapy-redis在setting配置SCHEDULER = "scrapy_redis.scheduler.Scheduler"替换原本的待爬取队列。使用redis进行任务分发与调度,把所有待爬取的请求都放入redis,所有爬虫都去redis读取请求。
Scrapy-Redis中的去重是由Duplication Filter组件实现的,该组件利用Redis中set集合不重复的特性,巧妙地实现了这个功能。首先Scrapy-Redis调度器接收引擎递过来的请求,然后将这个请求指纹存入set集合中检查是否重复,并把不重复的请求加入到Redis的请求队列中。
scrapy-redis不再使用原有的Spider类,重写RedisSpider继承Spider和RedisMixin类。当我们生成一个Spider继承RedisSpider时,调用setup_redis函数,这个函数会去连接redis数据库,然后会设置signals(信号):一个是当spider空闲时候的signal,会调用spider_idle函数,这个函数调用schedule_next_request函数,保证spider是一直活着的状态,并且抛出DontCloseSpider异常。一个是当抓到一个item时的signal,会调用item_scraped函数,这个函数会调用schedule_next_request函数,获取下一个request。
pip install scrapy-redis
scrapy startproject review .
2
# Enables scheduling storing requests queue in redis. 1.启用调度将请求存储进redis  必须
SCHEDULER = "scrapy_redis.scheduler.Scheduler"

# Ensure all spiders share same duplicates filter through redis. 2.确保所有spider通过redis共享相同的重复过滤。  必须
DUPEFILTER_CLASS = "scrapy_redis.dupefilter.RFPDupeFilter"

# Default requests serializer is pickle, but it can be changed to any module
# with loads and dumps functions. Note that pickle is not compatible between
# python versions.
# Caveat: In python 3.x, the serializer must return strings keys and support
# bytes as values. Because of this reason the json or msgpack module will not
# work by default. In python 2.x there is no such issue and you can use
# 'json' or 'msgpack' as serializers.
#SCHEDULER_SERIALIZER = "scrapy_redis.picklecompat"

# Don't cleanup redis queues, allows to pause/resume crawls.
#SCHEDULER_PERSIST = True

# Schedule requests using a priority queue. (default)
#SCHEDULER_QUEUE_CLASS = 'scrapy_redis.queue.PriorityQueue'

# Alternative queues.
#SCHEDULER_QUEUE_CLASS = 'scrapy_redis.queue.FifoQueue'
#SCHEDULER_QUEUE_CLASS = 'scrapy_redis.queue.LifoQueue'

# Max idle time to prevent the spider from being closed when distributed crawling.
# This only works if queue class is SpiderQueue or SpiderStack,
# and may also block the same time when your spider start at the first time (because the queue is empty).
#SCHEDULER_IDLE_BEFORE_CLOSE = 10

# Store scraped item in redis for post-processing. 公共管道,内置
ITEM_PIPELINES = {
    'scrapy_redis.pipelines.RedisPipeline': 300
}

# The item pipeline serializes and stores the items in this redis key.
#REDIS_ITEMS_KEY = '%(spider)s:items'

# The items serializer is by default ScrapyJSONEncoder. You can use any
# importable path to a callable object.
#REDIS_ITEMS_SERIALIZER = 'json.dumps'

# Specify the host and port to use when connecting to Redis (optional). 3.指定连接到Redis时要使用的主机和端口,或者设置REDIS_URL
#REDIS_HOST = 'localhost'
#REDIS_PORT = 6379

# Specify the full Redis URL for connecting (optional).
# If set, this takes precedence over the REDIS_HOST and REDIS_PORT settings.
#REDIS_URL = 'redis://user:pass@hostname:9001'

# Custom redis client parameters (i.e.: socket timeout, etc.)
#REDIS_PARAMS  = {}
# Use custom redis client class.
#REDIS_PARAMS['redis_cls'] = 'myproject.RedisClient'

# If True, it uses redis' ``spop`` operation. This could be useful if you
# want to avoid duplicates in your start urls list. In this cases, urls must
# be added via ``sadd`` command or you will get a type error from redis.
#REDIS_START_URLS_AS_SET = False

# Default start urls key for RedisSpider and RedisCrawlSpider.
#REDIS_START_URLS_KEY = '%(name)s:start_urls'

# Use other encoding than utf-8 for redis.
#REDIS_ENCODING = 'latin1'
2
3
4
5
6
7
8
9
10
11
12
13
14
15
16
17
18
19
20
21
22
23
24
25
26
27
28
29
30
31
32
33
34
35
36
37
38
39
40
41
42
43
44
45
46
47
48
49
50
51
52
53
54
55
56
57
58
59
60
61
62
63
64
65
参考: https://blog.csdn.net/qq_46485161/article/details/118863801